How to propagate basil is one of the most common questions for kitchen garden lovers and herb growers. Based on my own gardening experience, the best method to grow more basil is from cuttings. It’s fast, easy, and doesn’t need any special tools. In this post, I’ll guide you on how to propagate basil at home in both water and soil, using simple words and clear steps that even beginners can follow.
I have been growing basil for the last few years in my home garden. Every season, instead of buying new seeds, I simply take cuttings from healthy plants, root them, and grow fresh new basil plants in pots and grow bags. This guide is written based on my experience and what actually works in Indian weather.
IN THIS ARTICLE
Quick Tips for Basil Propagation
- Use fresh green stems, not woody or dried ones
- Always cut below a node (the area where leaves grow)
- Remove bottom leaves to avoid rotting in water or soil
- Use clean, sharp scissors to avoid infection
- Change water every 2–3 days if using water method
- Do not place cuttings in direct sunlight until roots form
- Use compost-rich, well-draining soil when planting
- Transplant after roots are 1 to 2 inches long
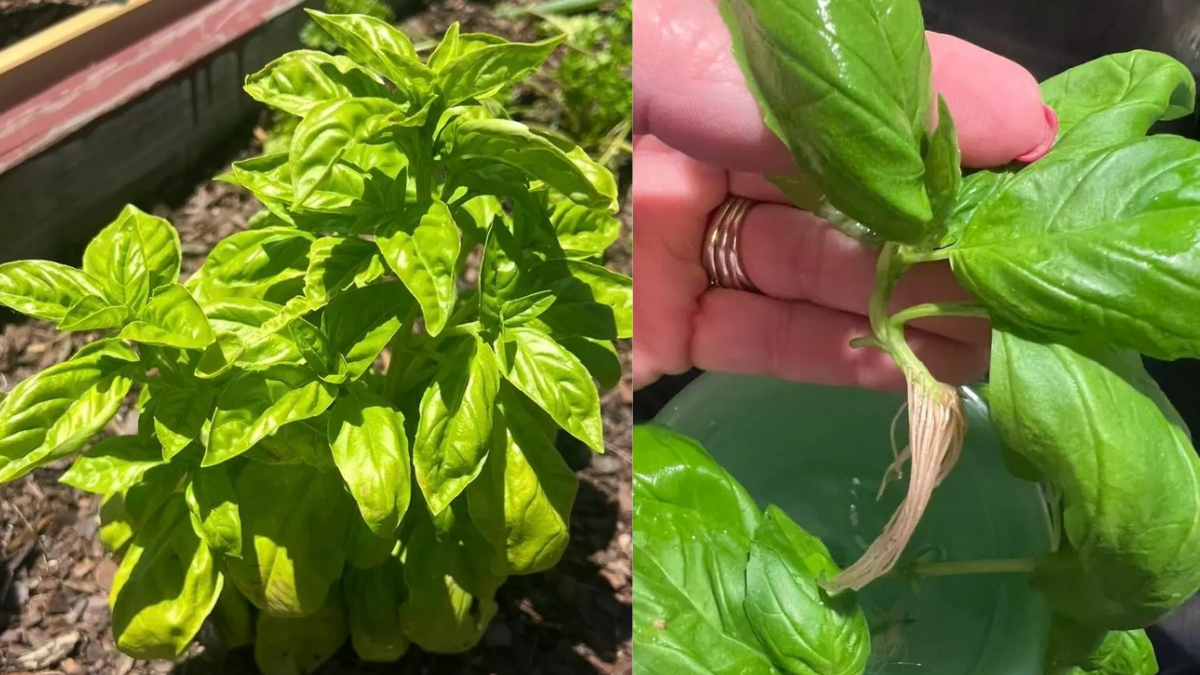
Step-by-Step: How to Propagate Basil from Cuttings in Water
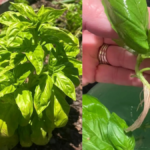
1. Choose a Healthy Basil Plant
This is the most beginner-friendly and reliable method. I’ve used this many times when I want to grow multiple basil plants quickly. The advantage is, you can actually see the roots growing in water, which builds confidence.
Start with a strong, healthy basil plant. Make sure the stem you select is green, soft (not woody), and disease-free. Avoid plants that are flowering, as they’re in their final growth stage and not suitable for propagation.
2. Cut the Stem Below a Node
Using a clean, sharp scissor or blade, cut a 4 to 6-inch stem just below a node. A node is where the leaf joins the stem. This is important because roots grow from nodes.
Make sure to cut at a slight angle for better water absorption.
3. Remove Bottom Leaves
Remove all leaves from the bottom 2 inches of the cutting. Keep only the top few leaves. This step prevents the leaves from rotting in water and helps the cutting focus on root development.
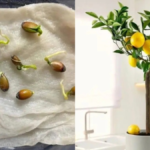
4. Place the Cutting in Water
Take a small clean glass or jar, fill it with filtered or room-temperature tap water, and place the cutting in it. Make sure the cut portion is submerged in water but the leaves remain above.
Do not use chlorinated or very cold water.
5. Keep the Jar in Indirect Sunlight
Place the glass in a bright but indirect sunlight area, like near a window. Avoid direct sunlight as it may cause the cutting to wilt or rot before rooting.
6. Change Water Every 2–3 Days
To prevent bacterial growth, change the water regularly. I usually change it every second day. Make sure the water level is always high enough to cover the node.
7. Wait for Roots to Appear
After 7 to 10 days, you’ll notice white roots starting to grow. Wait until the roots are at least 1 to 2 inches long before transplanting. Don’t rush this step – strong roots give better plant survival.
8. Transplant into Soil
Once the roots are long enough, transplant the cutting into a small pot filled with moist, well-draining soil. I usually use a mix of garden soil, compost, and sand.
Press the soil gently around the stem and water lightly.
9. Care After Transplanting
After transplanting, keep the pot in indirect light for the next 3–4 days to avoid transplant shock. Once new leaves start growing, shift the plant to full sunlight.
Continue regular care, and your new basil plant will be ready in 2–3 weeks.
Step-by-Step: How to Propagate Basil from Cuttings in Soil
I’ve also tried growing basil directly in soil without water rooting. It works well but needs more care in the beginning to avoid drying out or fungus problems.
1. Take a Cutting the Same Way
Take a 4 to 6-inch cutting from a healthy basil plant, just as explained above. Cut below a node and remove the lower leaves.
2. Prepare a Small Pot or Grow Bag
Use a small container with good drainage holes. Fill it with a soil mix made of garden soil + compost + sand or cocopeat. The soil should be light and moist, not hard or dry.
3. Dip the Cutting in Rooting Hormone (Optional)
If you have rooting powder or natural rooting hormone (like cinnamon or aloe vera gel), you can dip the cut end into it. This helps promote faster root growth, though it’s optional for basil.
4. Plant the Cutting in Soil
Make a small hole in the center of the pot and insert the cutting 1.5 to 2 inches deep. Press the soil around it gently so it stays upright.
5. Water Lightly
Water the soil lightly so it becomes moist but not soggy. Overwatering can lead to fungus or rotting. I always touch the soil before watering again – it should feel slightly moist.
6. Cover for Humidity (Optional)
If the weather is dry, you can cover the cutting with a plastic bag or plastic bottle (cut from the bottom) to maintain humidity. Keep a few holes for air.
7. Keep in Indirect Light
Place the pot in a location with indirect sunlight for about 7 days. Direct sunlight during this stage can dry out the cutting.
8. Watch for New Growth
After 10 to 15 days, you’ll see new leaves growing. This means the cutting has successfully rooted. You can now slowly shift it into full sun and start treating it like a regular basil plant.
Important Care Tips After Propagation
Once your basil cuttings have rooted and been transplanted:
- Water regularly, but let the top layer dry before watering again
- Give 6–8 hours of sunlight daily after the plant is established
- Pinch off the top leaves to encourage bushier growth
- Add compost every 15–20 days for better leaf production
- Avoid overwatering, especially during rainy season
Conclusion
Propagating basil from cuttings is a very simple and cost-effective method to grow fresh basil at home. From my own experience, I can say that the water method is easier for beginners, while the soil method works great if you manage the humidity well.
By following the step-by-step process and giving proper care, your basil plant will grow healthy and give you a fresh supply of leaves for your kitchen. Whether you’re growing in pots, kitchen window boxes, or balcony gardens, basil will reward you with fragrance, flavor, and greenery.
Best Basil Plant Care Tips for Beginners – Grow Healthy & Bushy Basil