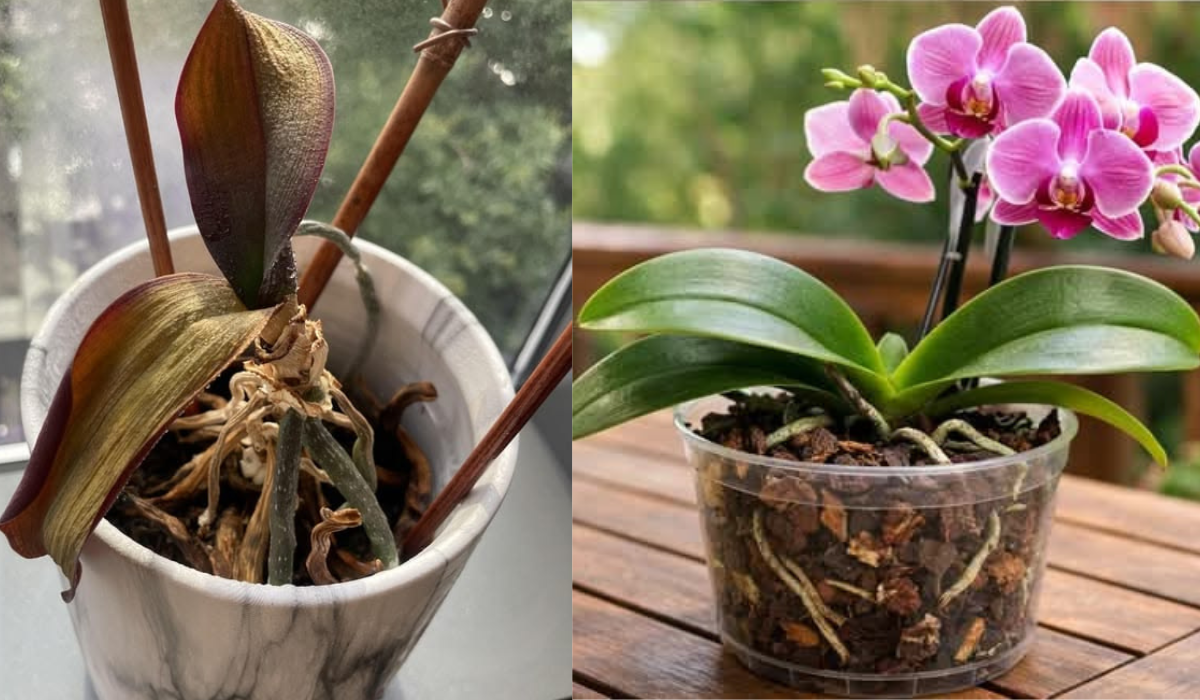
Seeing an orchid with wilting leaves, rotting roots, or no flowers is heartbreaking. I have been there. My first orchid started dropping leaves within weeks, and I thought it was dead. But after learning from experienced growers and a lot of trial and error, I discovered that most orchids can be saved. In this guide, I will share exactly how I revived my dying orchid using simple, proven steps.
IN THIS ARTICLE
How to Know Your Orchid Needs Help
Before you start, look for these common signs of a struggling orchid:
- Yellow or wrinkled leaves – The leaves become soft, leathery, or turn yellow
- No flowers for many months – The plant looks healthy but refuses to bloom
- Mushy or brown roots – Healthy orchid roots are firm and green or silvery
- Leaves drooping or falling off – The plant looks weak and sad
- Black spots on leaves – This can mean fungal infection
If you see any of these signs, do not throw your orchid away. From my experience, most orchids can bounce back with the right care.
Step 1: Take the Orchid Out of Its Pot
The first thing I do is gently remove the orchid from its pot. This lets me see what is happening with the roots. Old potting mix (usually bark or moss) breaks down over time and can smother the roots.
Carefully shake off all the old potting material. Be gentle. Orchid roots are thick but they can break easily.
Step 2: Inspect and Trim Dead Roots
This step is the most important. Healthy orchid roots are firm to the touch and green, silvery, or white when dry. Dead roots are brown, black, mushy, or papery hollow.
How I trim the roots:
- Using clean, sharp scissors, I cut off every root that is soft, mushy, brown, or black
- I also remove any roots that are completely dry and papery
- I keep only the roots that are firm and healthy, even if they are few
Do not be afraid to cut. I once removed 90% of an orchid’s roots, and it still survived. A few healthy roots are enough for the plant to recover.
Step 3: Clean and Treat the Remaining Roots
After trimming, I wash the remaining roots with lukewarm water. This removes any remaining dirt or fungus.
If I see any black spots or signs of rot on the remaining roots, I dip the roots in a solution of diluted hydrogen peroxide (one part peroxide to three parts water) for a few minutes. This kills harmful bacteria and fungus.
Let the roots air dry for a few hours before repotting.
Step 4: Remove Dead or Damaged Leaves
While the roots are drying, I look at the leaves. Any leaf that is completely yellow, black, or mushy should be removed.
How to remove leaves:
- For dead leaves, I gently pull them off. They usually come off easily
- For leaves that are partly damaged, I use clean scissors to cut only the dead part
- I never cut into healthy green tissue
If the crown (the center where new leaves grow) is black and mushy, the orchid is very difficult to save. But if the crown is still green and firm, there is hope.
Step 5: Choose the Right Pot and Fresh Potting Mix
Orchids need special pots and soil. Regular potting soil will kill them.
For the pot:
I use a clear plastic pot with many drainage holes and slits. Clear pots let light reach the roots (orchid roots photosynthesize), and holes provide air circulation.
For the potting mix:
I use fresh orchid bark mix. Never use regular soil. Bark allows water to drain quickly and air to reach the roots. Some growers mix in a little sphagnum moss to hold moisture, but mostly bark is best for reviving orchids.
Step 6: Repot the Orchid Correctly
Now I place the orchid back in its pot.
My repotting method:
- I put some bark at the bottom of the pot
- I hold the orchid in the center so the oldest leaves are at the rim of the pot
- I gently add bark around the roots, tapping the pot to settle it
- I do not bury the crown. The top of the roots and the crown must stay above the bark
- If the orchid is very unstable, I use a small stake or clip to hold it upright
The orchid should sit firmly in the pot but not be buried too deep.
Step 7: Water Correctly After Repotting
Watering is different for a recovering orchid.
My watering routine after repotting:
- I wait 5-7 days before the first watering. This gives cut roots time to heal
- Then I water thoroughly by running room temperature water through the pot
- I let all excess water drain out completely
- I never let the orchid sit in standing water
For the next few weeks, I water only when the potting mix is almost completely dry. For bark, this is usually every 7-10 days. Overwatering is the fastest way to kill a recovering orchid.
Step 8: Provide the Right Light and Temperature
Light and temperature are very important for recovery.
Light:
I keep my recovering orchid in bright indirect light. An east-facing window is perfect. No direct afternoon sun. Too much sun burns the leaves. Too little light stops recovery.
Temperature:
Day temperature between 65°F to 80°F (18°C to 27°C). Night temperature slightly cooler. This natural drop helps the orchid recover faster.
When Is It Too Late to Save an Orchid?
From my honest experience, some orchids cannot be saved. If the crown is completely black and mushy, the orchid will not recover. If every single root is dead and the leaves are all yellow or black, it is likely too late.
But even then, I sometimes keep the pot for a few weeks. Once, a completely rootless orchid surprised me by growing a tiny new root. Nature can be surprising.
conclusion
Reviving an orchid taught me patience. That first orchid I nearly threw away is now one of my healthiest plants. It blooms every year and reminds me that plants want to live. They just need the right conditions.
The most important lessons I learned are: cut away all dead roots, use fresh bark in a pot with drainage holes, water only when almost dry, and give bright indirect light. Do not rush. Do not overwater. Do not give up too soon.
FAQ – Revive an Orchid Plant
1. Can a dying orchid grow new roots?
Yes. With proper care, orchids can grow new roots even after losing most of their old ones. It takes time and patience.
2. How long does it take to revive an orchid?
Roots usually appear in 2-3 months. Full recovery, including new leaves and flowers, can take 6-12 months.
3. Should I cut off all dead roots?
Yes. Dead roots will only rot and spread disease. Cut them off completely.
4. Can I save an orchid with no leaves?
Very difficult. Leaves are needed for photosynthesis. But if the roots are healthy and the stem is green, there is a small chance.
5. When should I water after repotting?
Wait 5-7 days before the first watering. This gives cut roots time to heal. Then water only when the potting mix is almost completely dry.