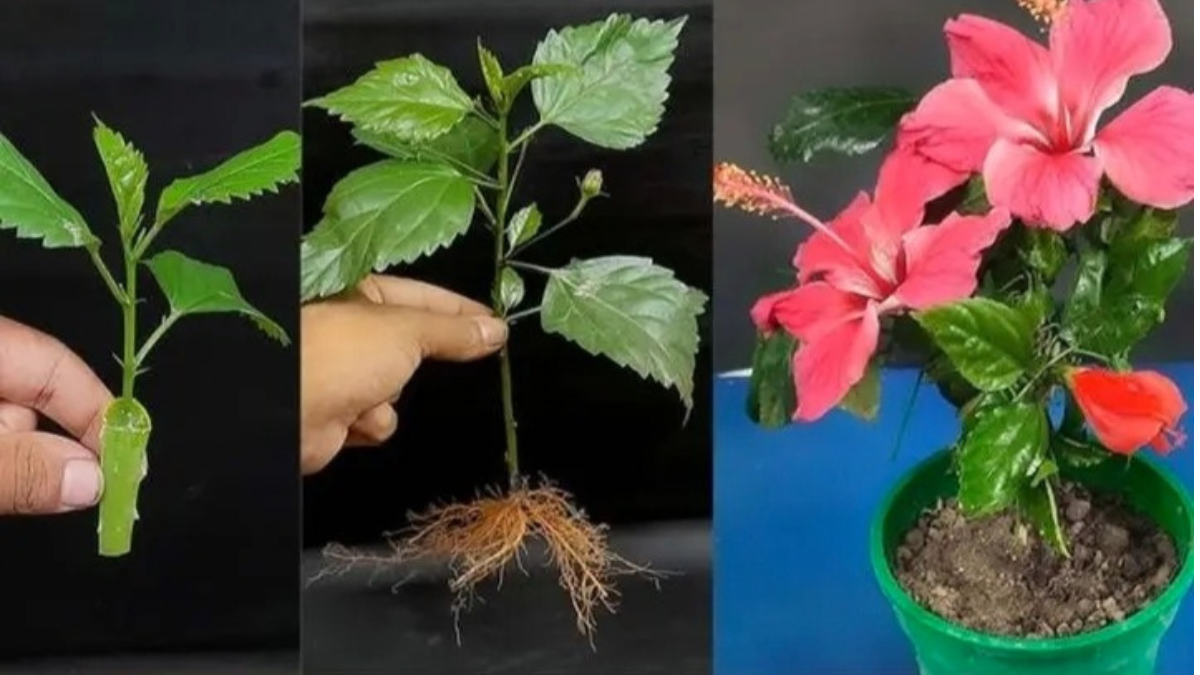
How to Propagate Hibiscus Cuttings in Water is an easy and natural way to grow new hibiscus plants at home. You only need a small cutting, clean water, and little care to see roots forming within a few weeks. I have tried this method many times in my garden, and in this post, I will share my personal experience with simple step-by-step instructions.
I come from a gardening background, and hibiscus has always been close to my heart. In my home garden, I grow many hibiscus varieties in different colors. When I first learned that hibiscus can grow roots in water, I tried it, and the joy of watching tiny roots coming out from a small cutting was unforgettable. From that time, I regularly use this method to make new hibiscus plants for my home and to gift to friends.
IN THIS ARTICLE
Why I Prefer Water Propagation for Hibiscus
From my experience, water propagation is the easiest method for beginners. Some reasons why I love this method:
- Simple method – You don’t need soil in the first step, only a glass of water.
- Low cost – No extra tools required, just a jar and clean water.
- Fun to watch – You can see the roots growing day by day.
- Safe method – No soil pests or fungus in the beginning stage.
Best Type of Hibiscus Cutting for Propagation
I have noticed that not every stem grows roots. The right cutting is very important. Here’s what always works for me:
- Take cutting from a healthy and mature hibiscus plant.
- Choose a semi-hardwood stem (not too soft, not too woody).
- Cuttings should be around 5–6 inches long.
- Always cut below a leaf node.
- Keep only the top 2–3 leaves and remove the rest.
- If you have rooting hormone, you can dip the cutting, but I have also rooted many cuttings without it.
Step-by-Step Guide: How to Propagate Hibiscus Cuttings in Water
I will now explain the process in the same way I do it at home.
Step 1: Prepare the Cutting
- Cut a 5–6 inch long stem from a healthy hibiscus plant.
- Remove bottom leaves and keep only 2–3 small leaves on top.
- Make a clean cut at an angle just below a node.
Step 2: Select the Container
- Take a glass jar or bottle. I prefer transparent glass because it lets me see the roots.
- Clean the jar properly before use.
Step 3: Fill with Water
- Add clean water into the jar.
- Water should cover at least 1–2 nodes of the cutting.
- If using tap water, leave it overnight so chlorine goes away.
Step 4: Place the Cutting
- Put the cutting in water with leaves above the surface.
- Make sure only the stem is inside the water, not the leaves.
- If I am growing many cuttings, I keep them in separate jars.
Step 5: Provide Right Conditions
- Keep the jar in a place with bright indirect sunlight.
- Avoid direct hot sun—it makes cuttings weak.
- Maintain warm temperature, around 20–30°C.
- Change water every 3–4 days to keep it fresh.
Root Growth Observation
- After 2–3 weeks, I usually see small roots starting.
- Sometimes it takes 4–6 weeks, depending on weather.
- When roots become 2–3 inches long, I transfer the cutting into soil.
Transplanting Hibiscus Cutting into Soil
When the roots are ready, I move the cutting to a pot. Here’s how I do it:
- Take a medium-size pot with drainage holes.
- Prepare a mix of garden soil + compost + sand (40:40:20 ratio).
- Plant the rooted cutting gently into the soil.
- Water lightly just after planting.
- Keep the pot in shade for 4–5 days, then slowly shift to sunlight.
My Tips for Success
Over time, I learned a few tricks that improved my success rate:
- Always change water every few days, otherwise cuttings rot.
- Keep only 2–3 leaves, not more. Too many leaves dry out the cutting.
- Take more than one cutting, because not all cuttings will root.
- Don’t keep the jar in strong sunlight—indirect light works best.
- If roots are growing slowly, I sometimes add a drop of liquid fertilizer in water.
Problems I Faced in Water Propagation
I also faced some failures, but each problem taught me something.
- Rotting of stem – This happened when I forgot to change water on time. Solution: always refresh water.
- Yellow leaves – Sometimes leaves turned yellow, but I just removed them, and the cutting still rooted.
- No roots for many weeks – In cold season, hibiscus takes longer to root. Solution: wait patiently or try in warm weather.
My Experience Story
When I first tried propagating hibiscus cuttings in water, I used five cuttings. Out of them, only two survived because I kept them in direct sun and forgot to change water regularly. But after learning from that mistake, my next batch was a success. I kept the jar in bright shade, changed water every third day, and after three weeks, small roots appeared. The happiness of seeing roots grow was something special. Later, I planted those rooted cuttings in pots, and today those plants are healthy and giving me big red flowers.
This method is not only useful but also enjoyable. I often propagate extra plants and gift them to my relatives and friends. It feels nice to share a plant that I grew with my own hands.
Conclusion
From my personal experience, propagating hibiscus cuttings in water is simple, budget-friendly, and successful if done with care. The whole process needs patience, but once you see roots coming, you will feel proud of your effort. Just follow the steps—select a good cutting, place it in water, keep in indirect light, and change water regularly. Soon, you will have a new hibiscus plant ready for soil.
If you love gardening, I highly suggest you try this method. It is the easiest way to grow hibiscus without buying new plants.
How to Care Hibiscus Plant | Complete Guide with My Experience


I think this internet site has very great composed articles content.