How to Propagate petunias from cuttings is an easy and cost-effective way to grow new petunia plants at home. By following a simple step-by-step method, you can root petunia cuttings in soil and enjoy colorful blooms throughout the season. In this guide, I am sharing my personal experience and proven techniques to help beginners successfully multiply petunias, save money, and fill their garden or balcony with vibrant flowers..
I have grown petunias for many years, and at first, I used to buy new plants every season. Then I discovered that petunias root very well from cuttings. I tried, failed a few times, and finally developed a method that works every time. Now I can grow many petunia plants from just a few cuttings.
IN THIS ARTICLE
Quick Tips to How to Propagate Petunias
- Choose healthy, non-flowering stems for best results.
- Take cuttings 6–8 cm long and remove lower leaves, keeping 2–3 small leaves at the top.
- Use a light, well-draining soil mix like coco peat + perlite.
- Keep cuttings in bright, indirect light with high humidity.
- Mist regularly but avoid overwatering to prevent rot.
- Optional: Use rooting hormone to speed up roots.
- Transplant after 2–4 weeks into bigger pots with compost.
- Provide 4–6 hours of sunlight daily for strong growth.
Materials Needed to Propagate Petunias
Before you start, gather all the materials to make propagation easier:
- Sharp, clean scissors or pruning shears
- Small pots or seed tray with drainage holes
- Light potting mix: coco peat + perlite or peat + sand
- Rooting hormone (optional, helps faster rooting)
- Clear plastic bag or mini greenhouse dome
- Spray bottle for misting water
- Labels for different varieties
Tip: Using a light, well-draining soil mix is very important — heavy garden soil can make stems rot.
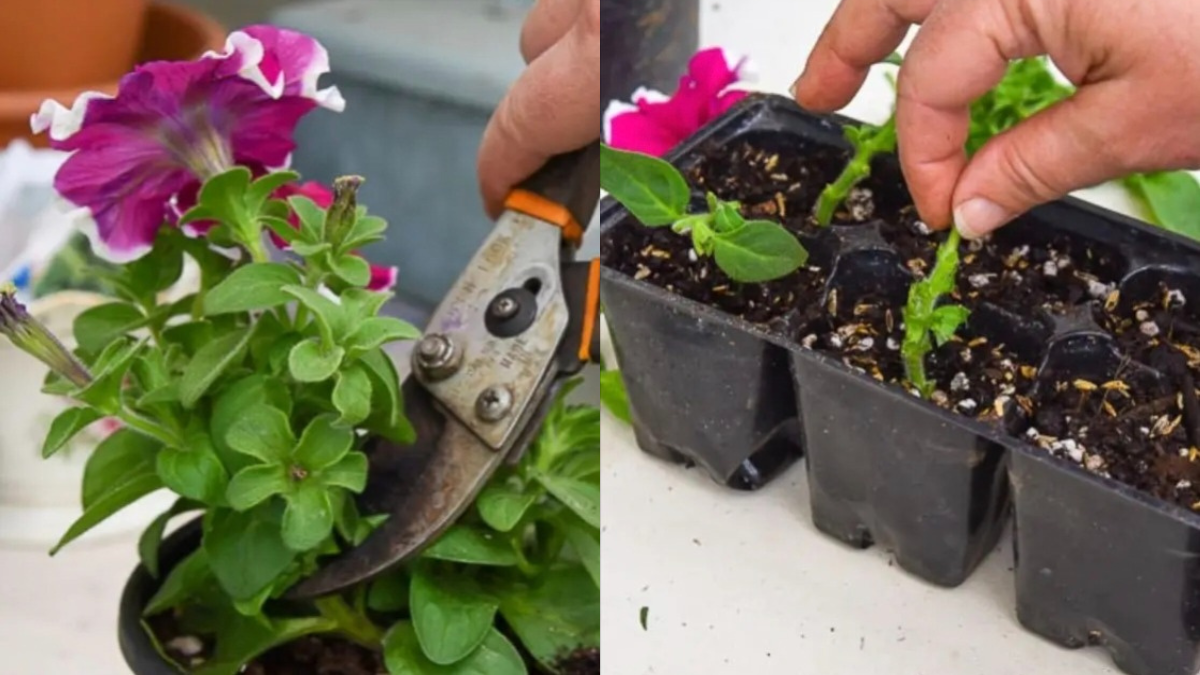
Step 1 – Choose and Prepare the Petunia Cutting
From my experience, choosing the right cutting is the first key step to success.
- Always select a healthy, non-flowering stem — young green shoots root faster.
- Cut a 6–8 cm tip just below a leaf node. Make a clean cut to increase success.
- Remove lower leaves, leaving 2–3 small leaves at the top. For large leaves, cut them in half to reduce water loss.
- Optional: Dip the cut end in rooting hormone. I have used it sometimes, and roots appear faster.
Tip from my experience: Take 3–4 cuttings from one plant. Even if one fails, the others usually grow successfully.
Step 2 – Plant the Petunia Cutting
Proper planting ensures strong root development.
- Fill pots or seed trays with a light, well-draining soil mix.
- Moisten the soil so it is damp, not waterlogged.
- Make a small hole with a pencil or stick and insert the cutting 2–3 cm deep.
- Firm the soil gently around the stem to hold it upright.
Tip: Don’t press soil too hard — roots need air to grow.
Step 3 – Provide the Right Environment for Rooting
Petunia cuttings need humidity and warmth to root.
- Cover the pot with a clear plastic bag or dome to maintain high humidity.
- Make sure the plastic does not touch the leaves — use small sticks if needed.
- Place in bright, indirect light. Avoid direct harsh sun.
- Keep the temperature around 20–25°C (68–77°F) for faster rooting.
From my experience: Open the cover daily for 5–10 minutes to allow fresh air and prevent mold.
Step 4 – Care for the Petunia Cutting
Gentle care is important during the rooting stage.
- Mist the soil once or twice a day to keep it moist.
- Avoid overwatering — too much water causes stem rot.
- After 10–14 days, gently tug the cutting. If you feel resistance, roots are forming.
- Full root development usually takes 2–4 weeks depending on the environment and cutting health.
Tip: If cuttings wilt, check humidity and shade. If stems rot, reduce watering and use lighter soil.
Step 5 – Transplant and Grow New Petunia Plants
Once the cuttings develop strong roots, they become new plants.
- Transplant to bigger pots with regular potting soil mixed with compost.
- Water normally, allowing the top 1 inch of soil to dry before watering again.
- Start fertilizing after 2 weeks with a weak liquid fertilizer (half strength).
- Provide 4–6 hours of direct sunlight daily for best flowering.
My story: After transplanting, I always see new growth in 1–2 weeks. Petunias bloom beautifully and fill my balcony with color. Using this method, I have multiplied my plants without buying new seedlings.
Watering, Soil, and Sunlight Tips
- Watering: Keep soil damp during rooting; after transplant, water when the top 1 inch is dry.
- Soil: Use light, well-draining soil for rooting; later, mix compost for mature plants.
- Sunlight: Rooted cuttings prefer bright indirect light; mature plants love full sun for 5–6 hours daily.
Common Problems When Propagating Petunias
| Problem | Cause | Solution |
|---|---|---|
| Cuttings wilt | Low humidity or strong sun | Cover with plastic, keep in bright shade |
| Stem rots | Soil too wet | Use lighter soil and reduce watering |
| No roots after 3 weeks | Weak cutting or cold temperature | Take new cuttings in warmer conditions |
Tip: Always take multiple cuttings. Even if one fails, others usually succeed.
Conclusion
From my personal gardening experience, propagating petunias from cuttings is simple, cost-effective, and rewarding. By following these 5 steps:
- Choose and prepare the cutting
- Plant it in light soil
- Provide proper humidity and temperature
- Care gently and check for roots
- Transplant and grow
How to Propagate Hydrangeas – 3 Easy Methods (Water, Cutting, and Soil)